Tables
Under Tables you define where your guests sit: which tables stand in which areas (for example Tent A, Hall, Beer garden) and how they are arranged on the floor plan. The till later shows these tables as a list and as a map, colored for "free", "open" and "waiting for service".
You reach the page via Tables in the sidebar. Administrators and members with the events permission can edit it.
Areas and tables belong to the organization, not to an event. Your marquee is set up the same way every year — you draw it once and reuse the plan at every event. Whether an event works with tables and which areas it uses is set in the event.
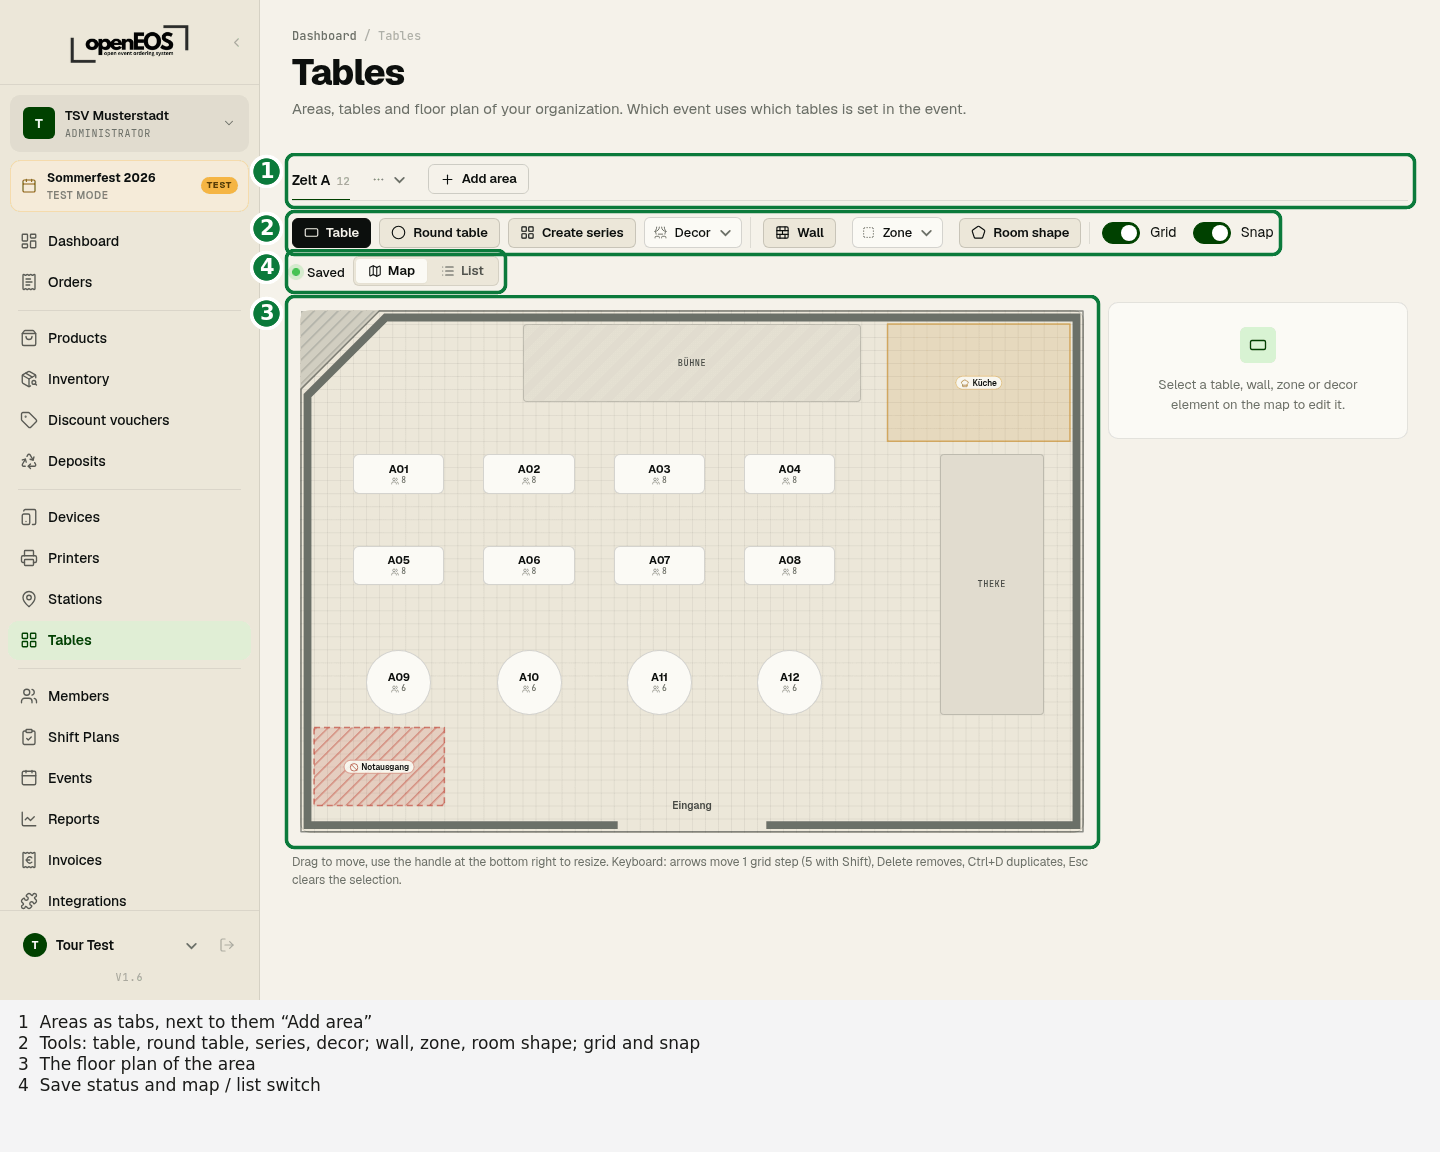
- Areas — each area has its own tab and its own map. Add area next to them creates more.
- Toolbar — add tables and decor, create a series, draw walls, zones and the room shape, switch the grid and snapping.
- Floor plan — this is where you drag tables into place.
- Save status and the Map | List switch.
The first area
If nothing exists yet, the page offers two ways in:
- Create area — you enter a name and start with an empty map.
- Create example (Tent A, A01–A12) — creates an area with twelve tables. It is the quickest way to see how it looks; you adjust names and layout afterwards.
The menu on an area's tab (the arrow next to its name) offers Change name and size, Move left, Move right and Delete area. The map size is given in units: a table is 80 units, the default map 1200 × 800. If the map gets smaller, tables move to the edge.
Deleting an area removes its map and its tables. Orders are kept.
Creating tables
One at a time
In the toolbar, Table adds a rectangular table and Round table a round one. The new table gets the next number in the row (after A12 comes A13), appears in a free spot on the map and is selected right away; you then drag it into place.
As a series
For a whole marquee full of beer tables use Create series:
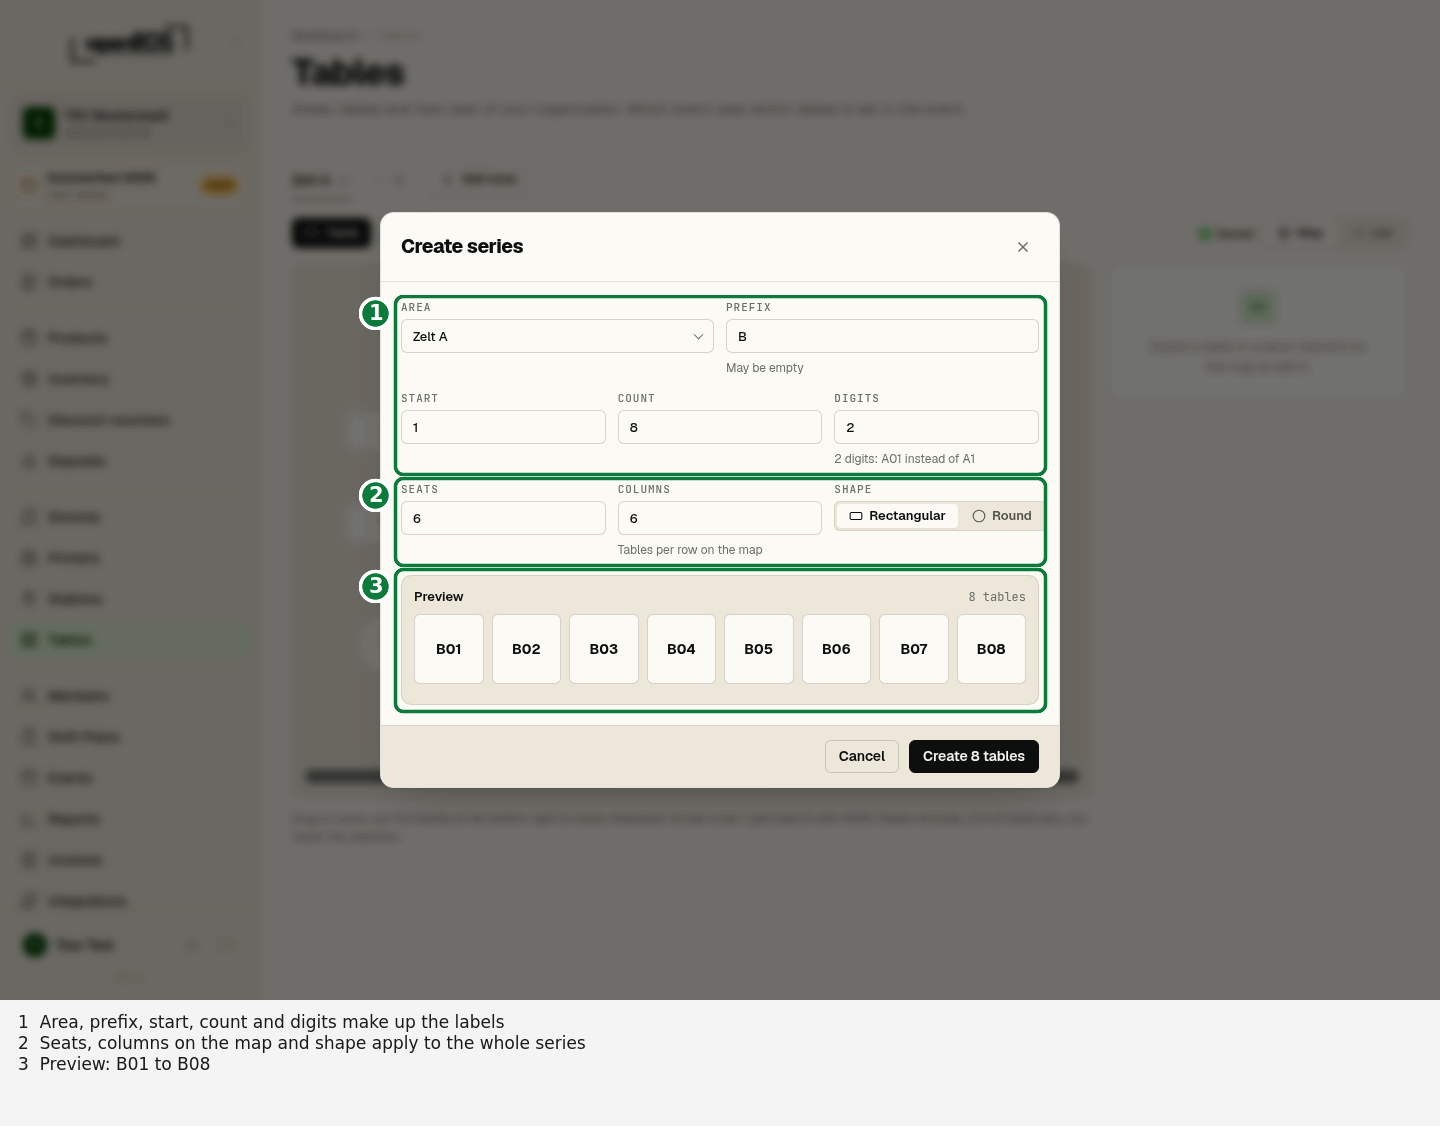
| Field | Meaning |
|---|---|
| Area | Which area the tables go into |
| Prefix | Letters before the number, e.g. B — may be empty |
| Start and Count | First number and how many tables |
| Digits | With 2 digits the table is called B01 instead of B1 |
| Seats | Seats per table (optional) |
| Shape | Rectangular or round |
| Columns | How many tables per row on the map |
The preview shows every label before you create them. If a label already exists it is marked taken, and you can only create the series once you change the prefix or start.
There can only be one table 12 — not in Tent A and in the beer garden at the same time. The till, kitchen tickets and reports only know a table by its label. So use prefixes such as A and G when several areas have tables. A label can be up to 20 characters long.
Designing the floor plan
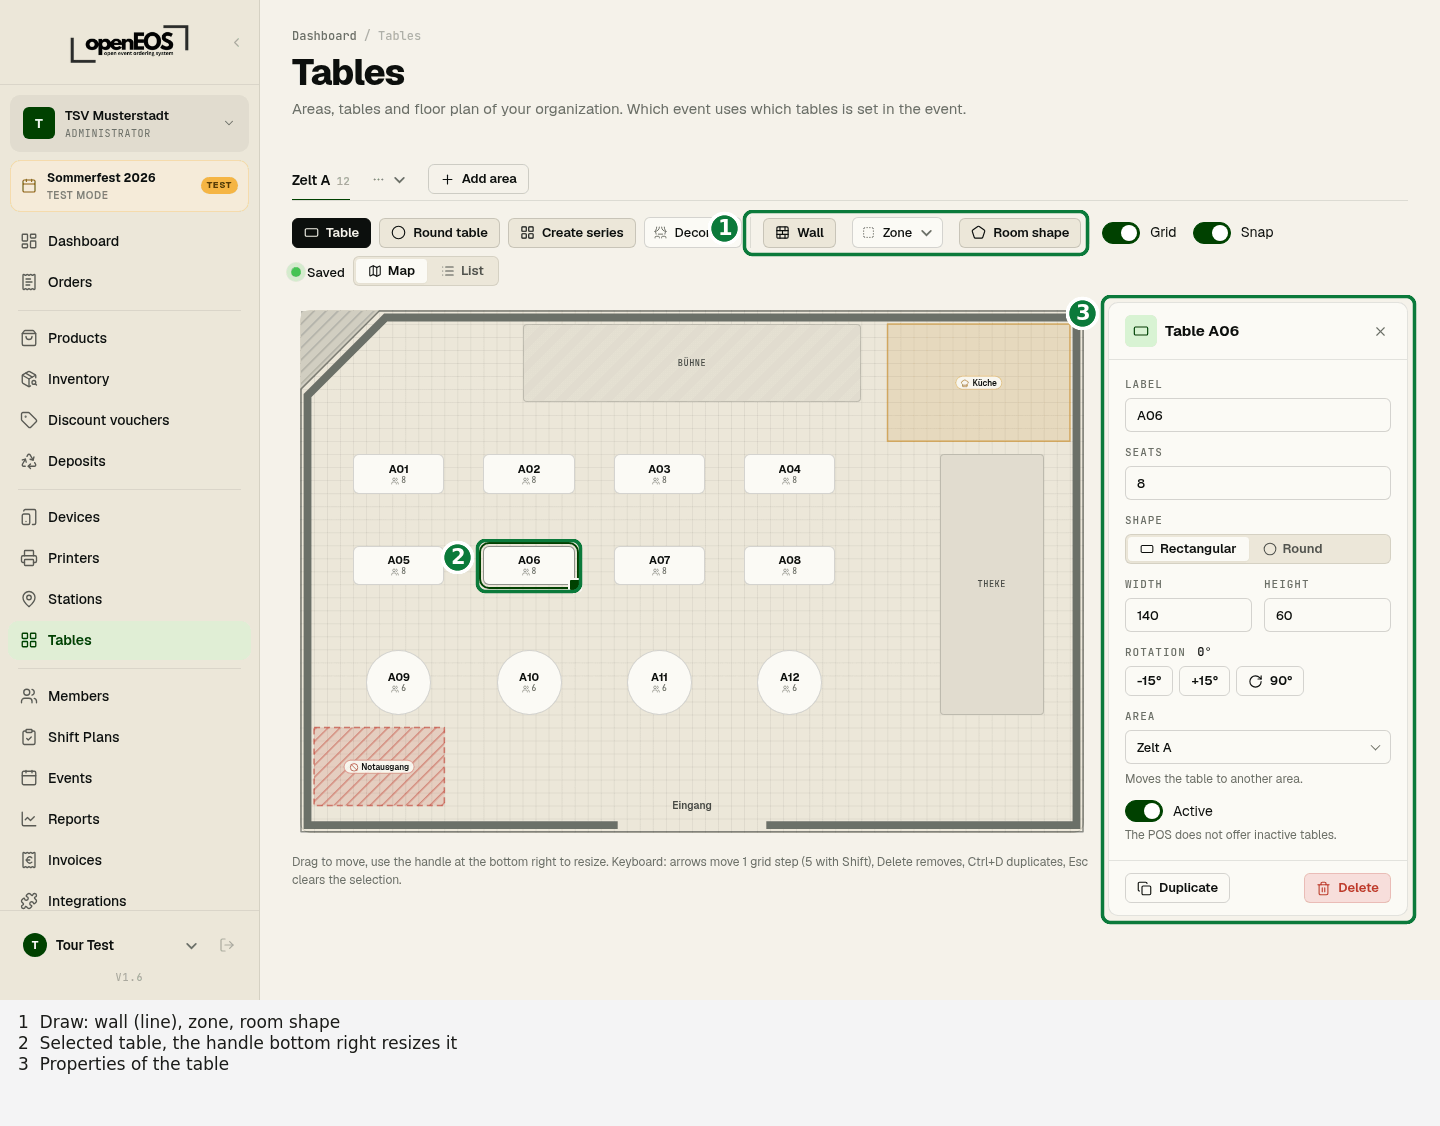
Tap or click a table to select it. Its properties appear on the right:
- Label and Seats
- Shape — rectangular or round
- Width and Height
- Rotation — in 15-degree steps left or right, or by 90 degrees
- Area — moves the table to another area
- Active — the till does not offer inactive tables, but they stay on the plan, for example the table that is only set up when it gets busy
- Duplicate and Delete
On the map itself:
- Dragging moves a table. With Snap switched on it jumps to the grid, which keeps rows straight.
- The handle at the bottom right changes the size.
- Decor adds a Bar, Stage or a Label (e.g. "Entrance"). Decor helps your team find their way on the map; it cannot be tapped at the till.
Walls, zones and room shape
To make the plan look like your tent or hall, use the Draw tools in the toolbar:
- Wall — drawn as a line: tap or click point by point, around corners too. A double-click or Done finishes the wall, Backspace removes the last point, Esc cancels. With the wall selected, you set its Thickness on the right.
- Zone — an area with a type: Kitchen, Blocked area, Bar or Other. Place at least three points and finish with a double-click, a tap on the first point or Done. On the right you change Type and Label. Zones are for display only — tables do not belong to a zone.
- Room shape — the outline of the room. Without one, the whole map is a rectangle. Drag the corners into place and insert new points at the edge midpoints, for an L-shaped hall for example. Outside the shape the map is greyed out and hatched. Reset to rectangle undoes it.
While drawing, points snap to the grid and to angles of 0, 45 and 90 degrees as long as Snap is on. Delete removes a selected point or a whole element.
Blocked areas are hatched. If a table lies outside the room shape or in a blocked area, it is flagged, and above the map you see something like "Table A12 is outside the room shape or in a blocked area. The POS still offers it." New tables are placed in a free spot inside the room automatically.
At the till, the map shows walls, zones and the room shape the same way; only tables can be tapped there.
With the keyboard
| Key | Effect |
|---|---|
| Arrow keys | Move the selected table by one grid step |
| Shift + arrow key | Move by five grid steps |
| Delete | Delete (asks first); while drawing, the selected point |
| Ctrl + D (Mac: Cmd + D) | Duplicate |
| Esc | Clear the selection or cancel drawing |
Saving
You don't need to save anything. Every change is stored shortly after you let go; at the top right you see Saving … and then Saved. If it fails — for example without a connection — the table jumps back to its old position and a message appears. If two people edit the plan at the same time, the most recently saved change wins.
The list
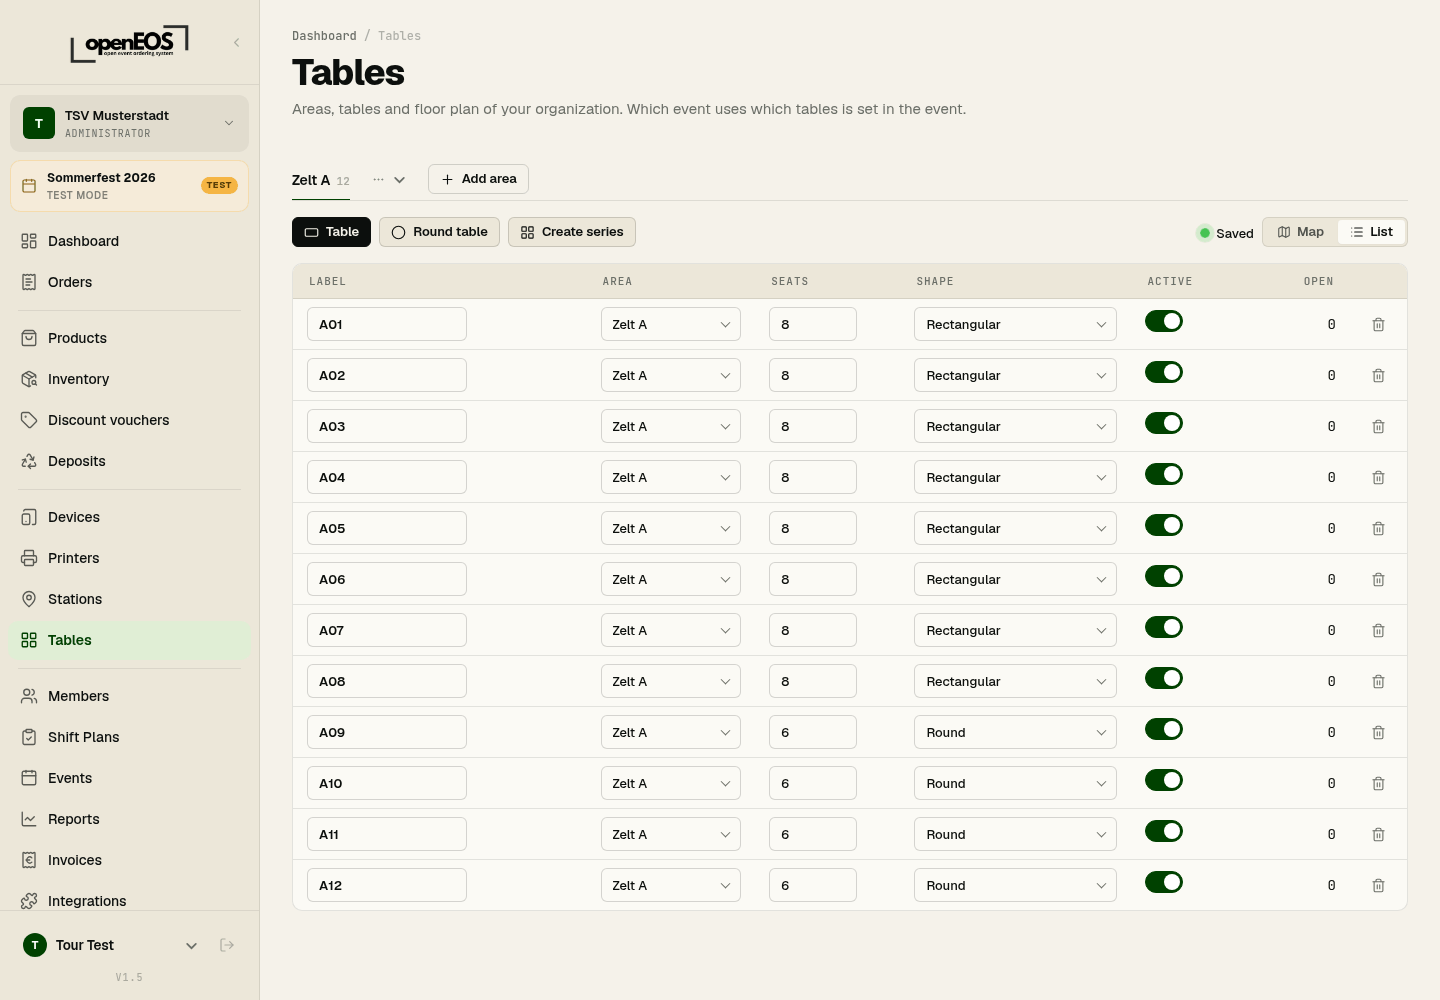
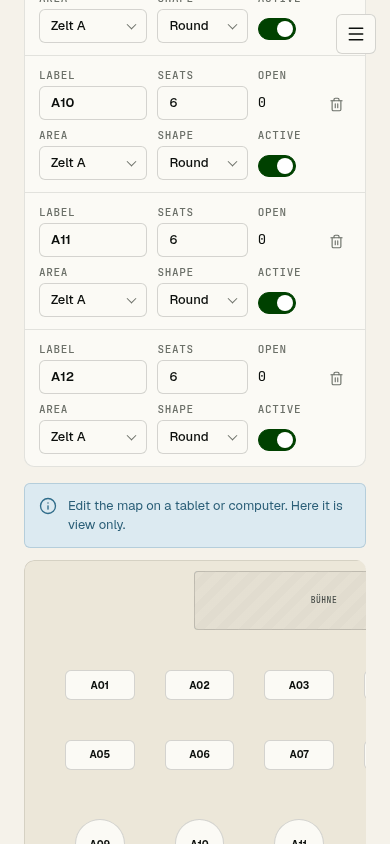
With List instead of Map you see all tables as a table: label, area, seats, shape, active and the number of open orders. You change label, seats, shape, area and active directly in the row. For many tables this is quicker than the map.
Renaming and deleting during the event
- Renaming works at any time. Open orders of the table take on the new label; orders that are already paid keep the old one, so receipts and reports stay correct.
- Deleting only works once no order is open at the table any more. Otherwise you see "There are still open orders at this table. Settle them first." Paid orders keep their table number.
If you only want to take a table out of the till for a while, set it to inactive instead of deleting it.
On a phone
You edit the map on a tablet or computer. On a narrow screen the page shows the list and below it a preview of the map, with walls and zones, and the note "Edit the map on a tablet or computer. Here it is view only." Creating, renaming, creating a series and deleting tables also work there.
Next steps
- In the event, choose Predefined tables and enable the areas.
- Optionally give each till a default area and its table selection (number, list or map) under Devices.
- Open a table at the till.