Selling at the till
This page covers the till itself — what your team does on the day. For how a device becomes a till, see Connecting devices; for how tables and the floor plan are set up, see Tables.
While the event is in test mode you can run through the whole thing: up to 25 orders cost nothing. The till then shows a slim warning strip below the header: "Test mode — Orders will be deleted on activation". It cannot be dismissed and stays in place on a phone while you scroll. Activating the event deletes the test orders but keeps your setup.
How the till starts
What you see after switching on depends on two settings: the device's service mode (Devices) and the event's table mode (Events).
| Device | Event table mode | The till starts with … |
|---|---|---|
| Counter | any | the order view — everything is booked at the counter |
| Table Service | No tables (counter service) | the order view — everything is booked at the counter |
| Table Service | Enter table number freely | Open table with a keypad |
| Table Service | Predefined tables | Open table with the device's table selection: number, list or map |
If the till requires a PIN, the PIN screen comes first — see Signing in and locking.
The header
The top bar always shows the same things:
- On the left the name of the till and — if the device has a default area — that area, e.g. "Till 3 · Zelt A". Below it the running event.
- Table — in the order view a green pill shows who you are booking for: "Table A10", "Counter" or "To go". Tapping it opens Choose table.
- Status — Online (green dot), Connecting … or No live data (yellow) and Offline (red). Next to it the till's receipt printer by name, if one is assigned, and the time. On narrower screens only the dot remains.
- Menu (the three lines) — order history, open orders, deposit return, open cash drawer, appearance and sign out device. Only what is set up for this till appears.
- Staff member — with a PIN, the initials and name of whoever is signed in, with the lock next to it.
In test mode the warning strip "Test mode — Orders will be deleted on activation" sits below the header.
Light or dark
In the Menu, under Appearance, you choose Light, Dark or System (follows the device setting). The choice applies to this till only and takes effect at once — dark is easier on the eyes in an evening tent, light is easier to read in the sun. Customer and station displays are set separately under Screens.
Opening a table
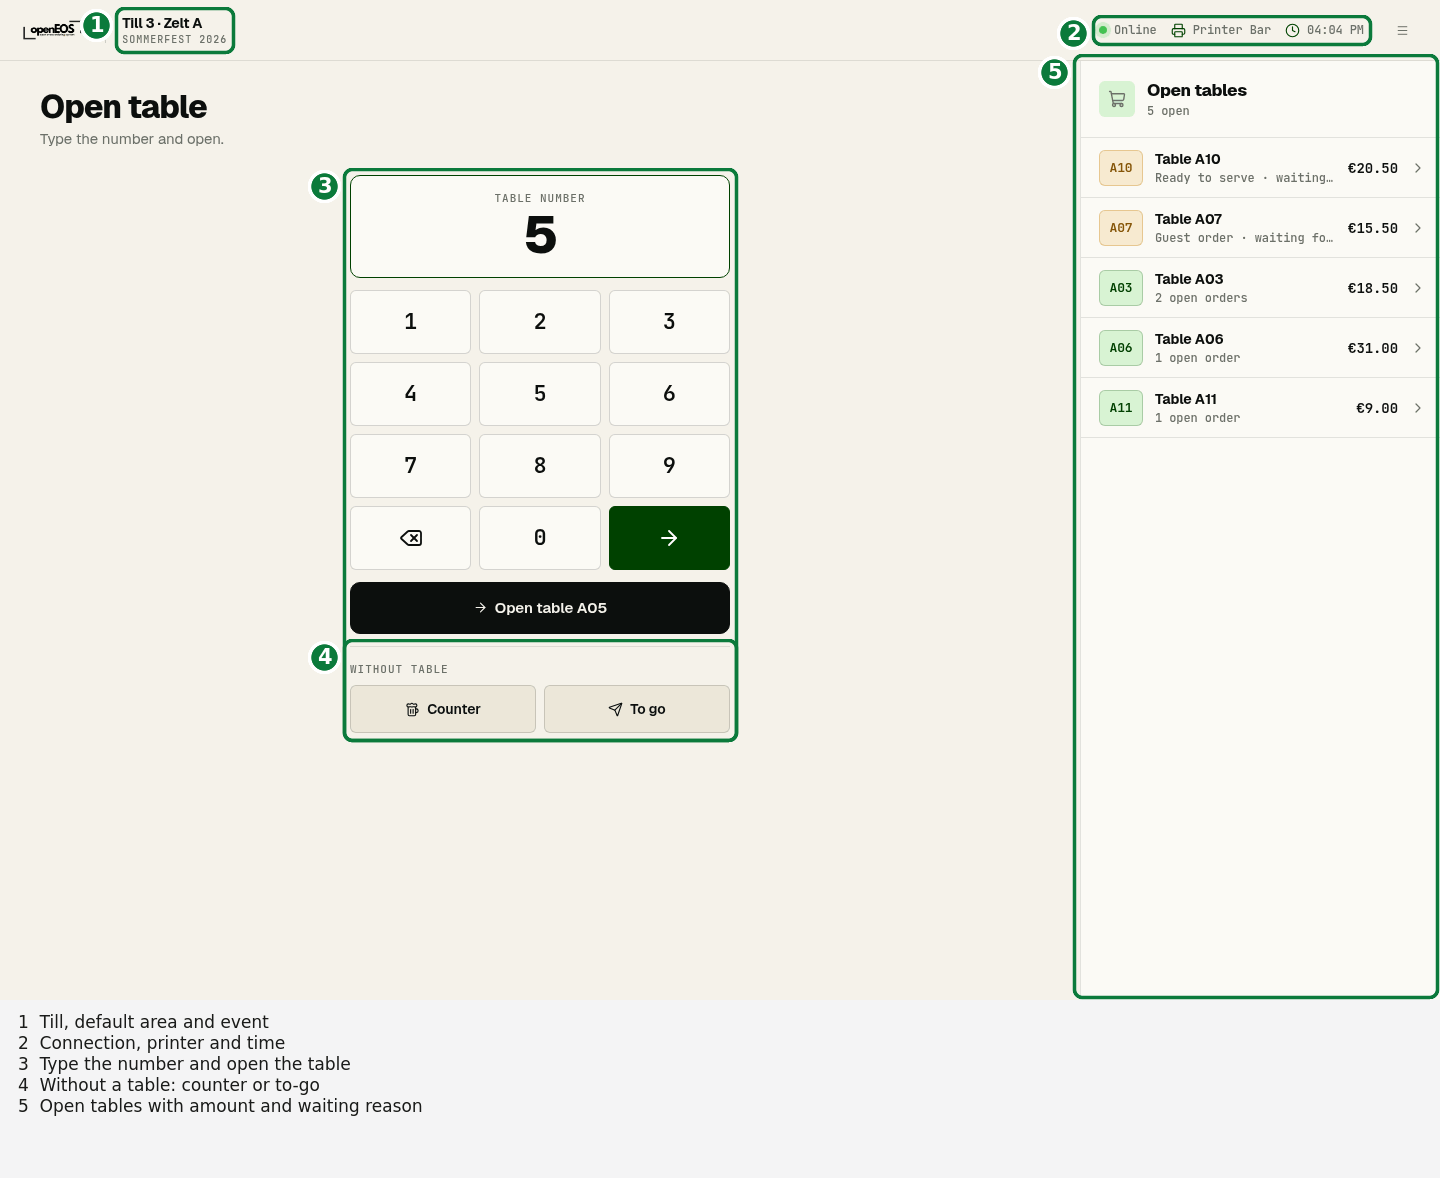
With table service every order starts with the question: which table? How you find it — by number, from the list or on the map — is fixed per device: under Devices → device → Settings in Table selection on the POS. There is no switch at the till itself; it always shows exactly that view, both when opening a table and under Choose table. That way staff in the tent can work with the map while the bar uses the keypad.
If the event uses freely entered table numbers, every till shows the keypad.
Number
Type the table number — on screen or with a keyboard — then tap Open table … or the green arrow.
- With freely entered numbers the till accepts anything up to five characters.
- With predefined tables it looks for the matching table:
5findsA05. If several match (sayA05andB05), they appear as choices below. If none matches you see "No table “…”" and the table cannot be opened.
List
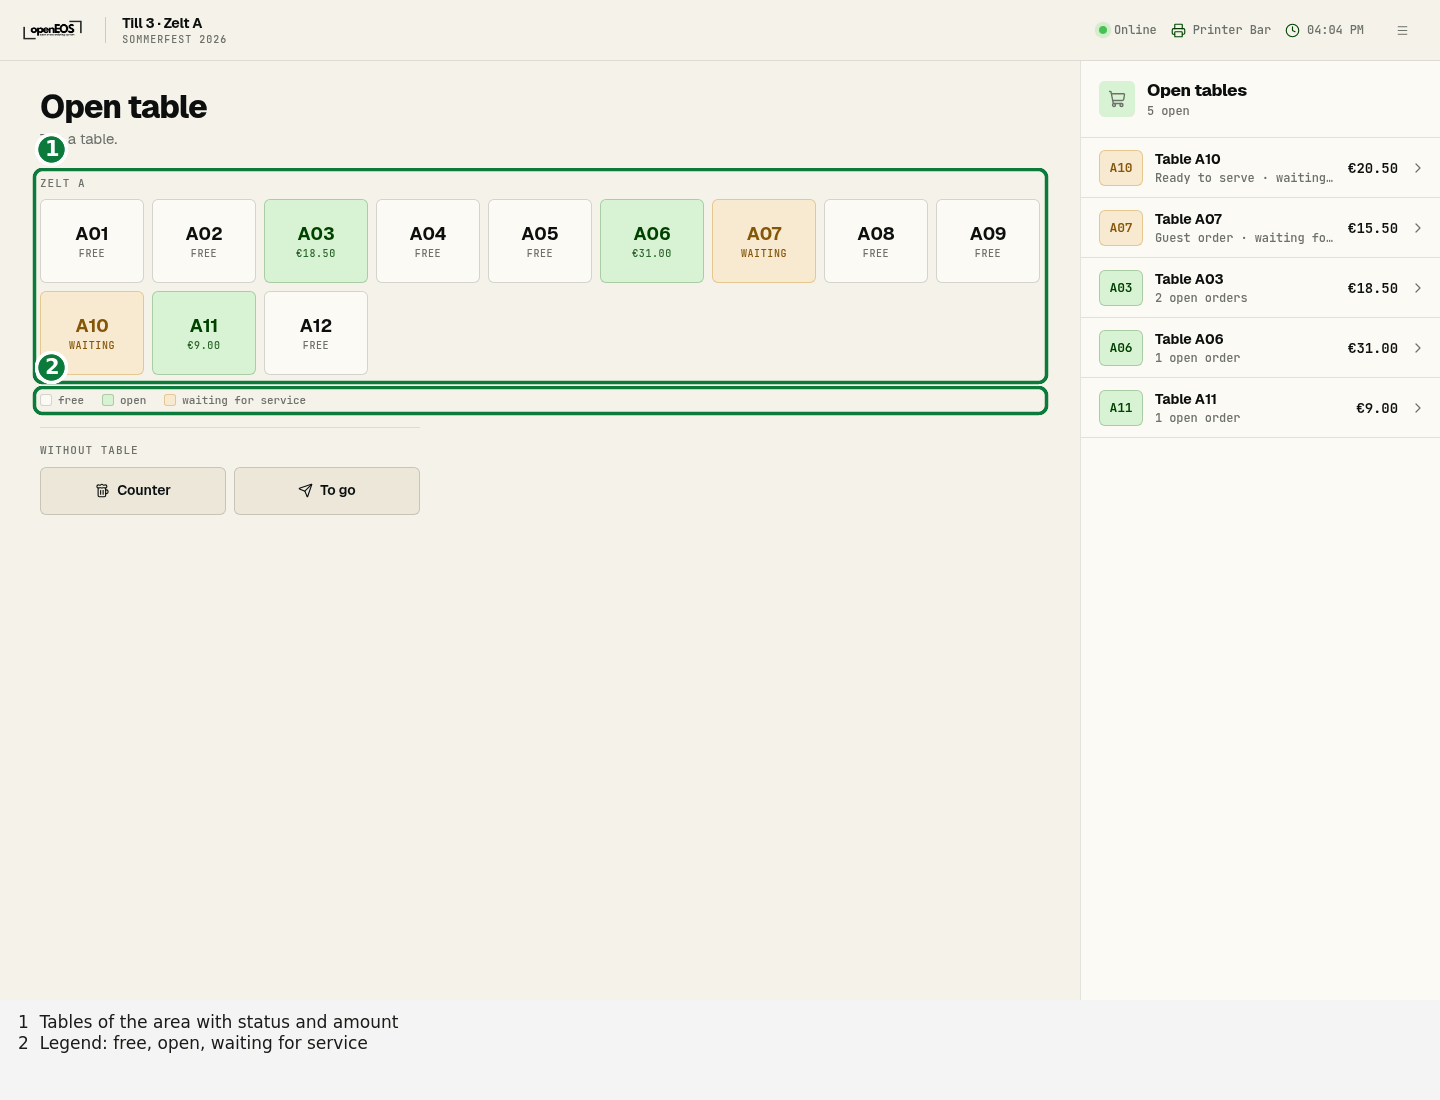
All enabled tables by area, the till's default area first. Each table shows its state:
| Color | Meaning |
|---|---|
| light | free |
| green | open — there are unpaid orders, or a cart on this till; plus the open amount |
| yellow | waiting for service — see Open tables |
Map
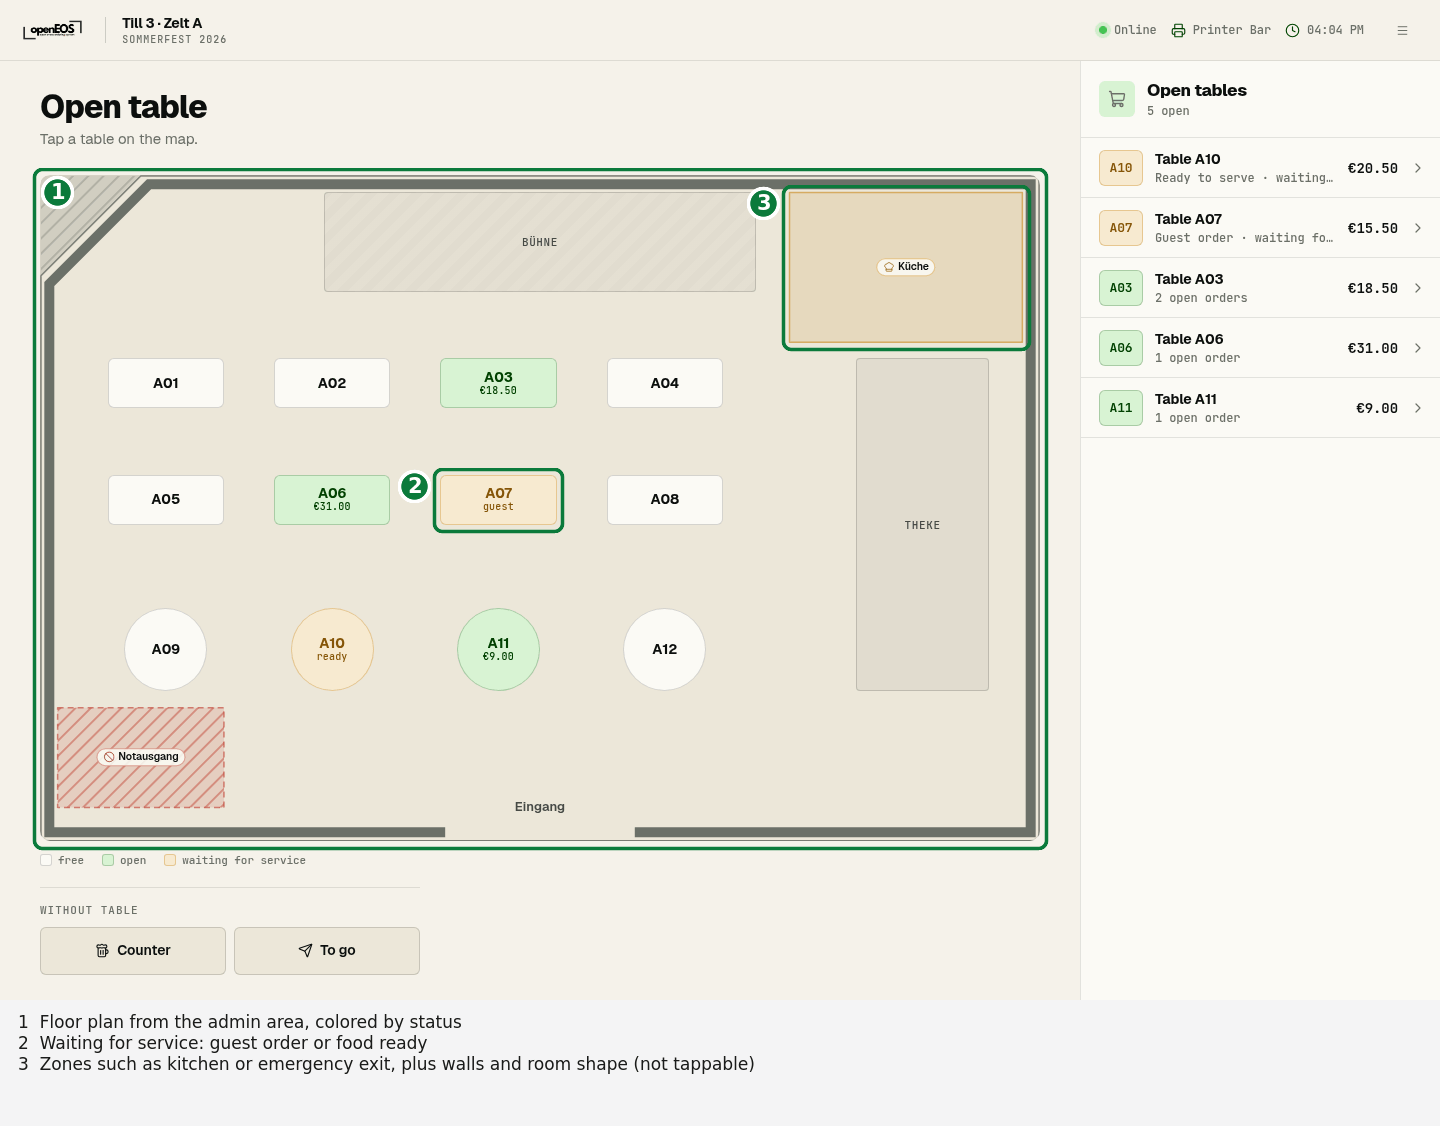
The floor plan from the admin area with the same colors, plus walls, zones and the room shape for orientation. Tap the table you want to open. If there are several areas, you switch between them with tabs above the map. On a phone the map can be swiped sideways.
The map is available once an area has a floor plan. If the device's table selection is Automatic, the till shows the map when its default area has a plan, otherwise the list.
Without a table: counter and to go
Below the keypad (or below the list and map) are Counter and To go. Use them to book without a table, for someone buying straight at the counter, say. To-go orders get the note "To-go" so the kitchen and pick-up can tell them apart.
Open tables
On the right (on a phone below the table choice) are all tables where something is open — waiting ones first, oldest at the top. Each row shows the amount and the reason:
- "2 open orders" — sent but not yet paid
- "3 items not sent" — a parked cart on this till
- Guest order · "waiting for 4 min" — a guest ordered on their own (online order). Opening the table confirms that someone is taking care of it; the table is no longer yellow afterwards.
- Ready to serve — the kitchen or bar has marked items as ready; they need to go to the table. See Served.
Tapping the row opens the table.
Ordering
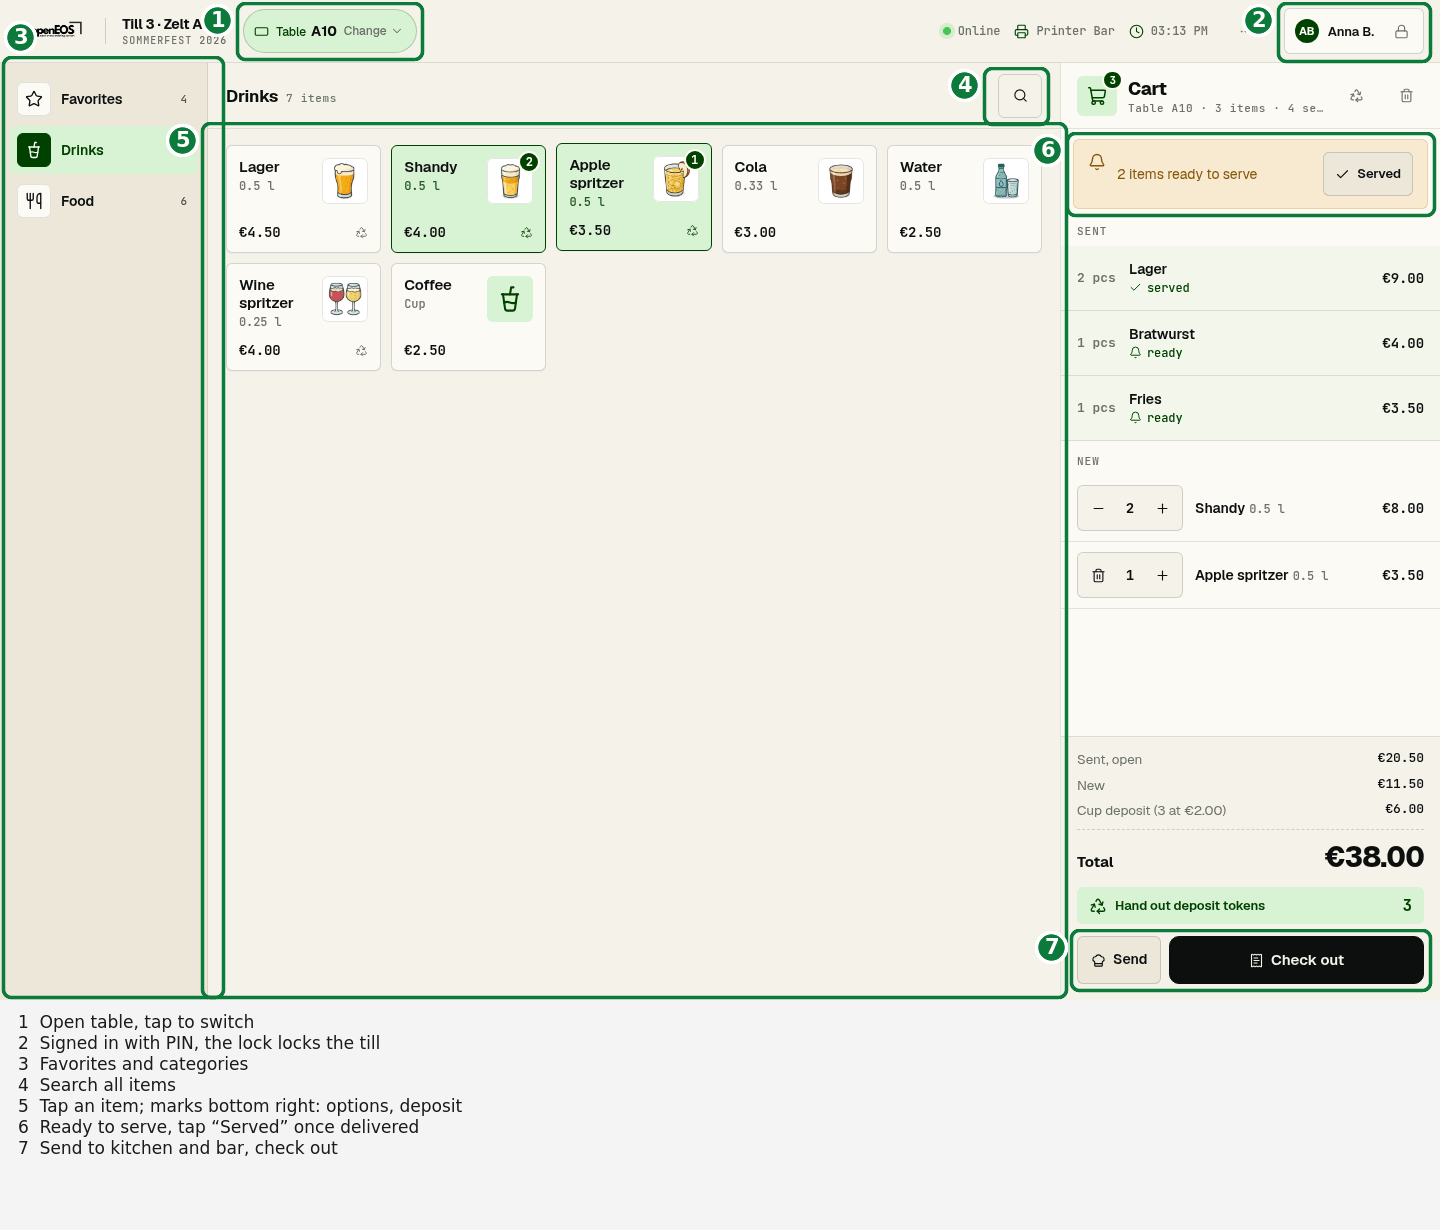
- Choose a category — on the left, each with its color and icon from the admin area (Categories). At the very top are the Favorites, if any have been marked in the admin area (Products).
- Tap items — each tap adds another one to the cart; the number on the tile shows how many. The magnifier at the top right searches all items.
- Change quantities — in the cart with − and +. At one piece the minus turns into a bin.
Each tile shows the first line of the description under the name (e.g. "0.5 l") and the product picture (or the category icon) on the right. Small marks at the bottom right tell you the item has options or comes with a deposit. When stock runs low the tile says "3 left"; sold-out items are greyed out.
Options and notes
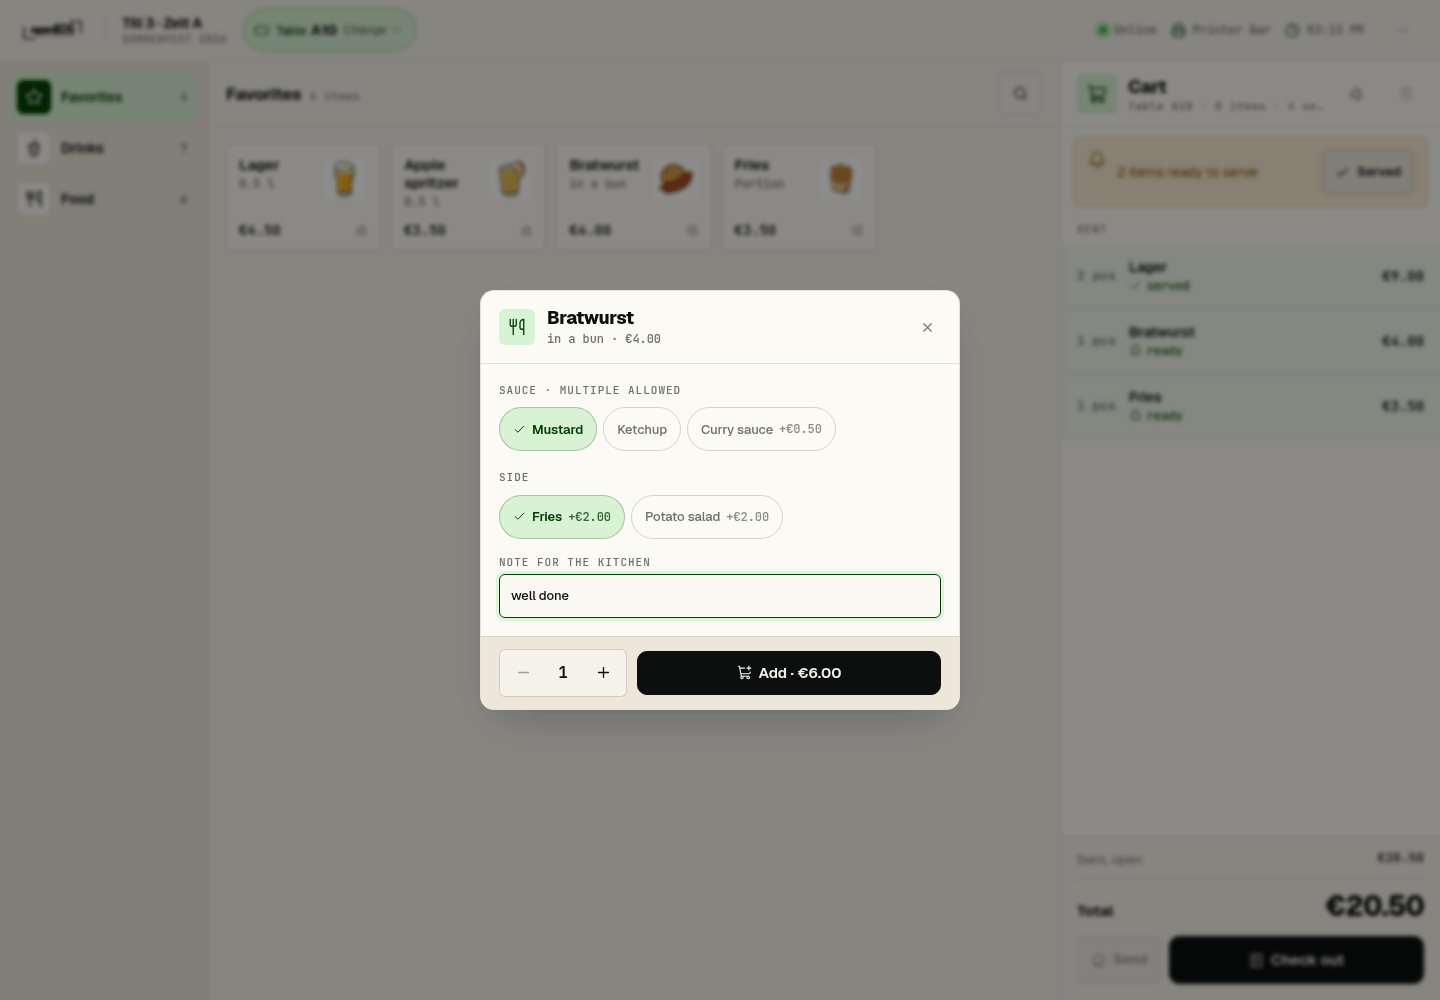
If an item has options, tapping it opens a window:
- Options are buttons, with surcharges shown. "multiple allowed" allows several, required must be chosen before you can continue.
- For ingredients everything is preselected; whatever is deselected goes on the ticket as "without …".
- Note for the kitchen — for example "well done".
- At the bottom the quantity and Add with the price.
Tapping a cart line that has not been sent yet opens the same window to change it.
The cart
The cart on the right belongs to the open table. It has up to two sections:
- Sent — what has already gone to the kitchen and bar for this table, with its state: sent, ready or served. You can't change these lines here; cancelling works via the order history.
- New — what you are typing in right now.
Below are the sums, one line per deposit type (e.g. "Cup deposit (3 at €2.00)") and the Total. If a deposit is charged, a green box shows how many deposit tokens to hand out. The bin at the top only clears the new lines; from three lines on the till asks first.
Send or check out
At the bottom of the cart there are one or two buttons. Which ones depends on the event's checkout mode (Events):
| Checkout mode | Buttons | How it works |
|---|---|---|
| Pay immediately | Check out | Order and pay in one step. The order is only created — and sent to the kitchen and bar — when it is paid. There is no Send button. |
| Run a tab | Send and Check out | Send passes the new items to the kitchen and bar without taking payment; they then appear under Sent and the table is open. Later, often after several rounds, you check out everything at once. |
Check out always settles everything that is open at the table: all sent, unpaid orders plus the new items. New items and the payment are booked together: if the payment is cancelled or the card is declined, no order is created, and the kitchen and bar get nothing that has not been paid.
After sending, the table stays open so you can keep ordering. After checking out you go back to Open table; at the counter the empty order view stays.
Open orders at the counter
If you run a tab and sell without a table (Counter device or counter service), there are no tables to list open orders under. Instead, the menu and the cart offer Open orders: a list of all open orders without a table. Select one or more and check them out together.
Served
When the kitchen or bar marks items of a table as ready, the table turns yellow ("waiting for service"). Opening it shows, for example, "2 items ready to serve" above the cart. Once the food is on the table, tap Served — the items count as delivered and the table turns green or free again.
Checking out
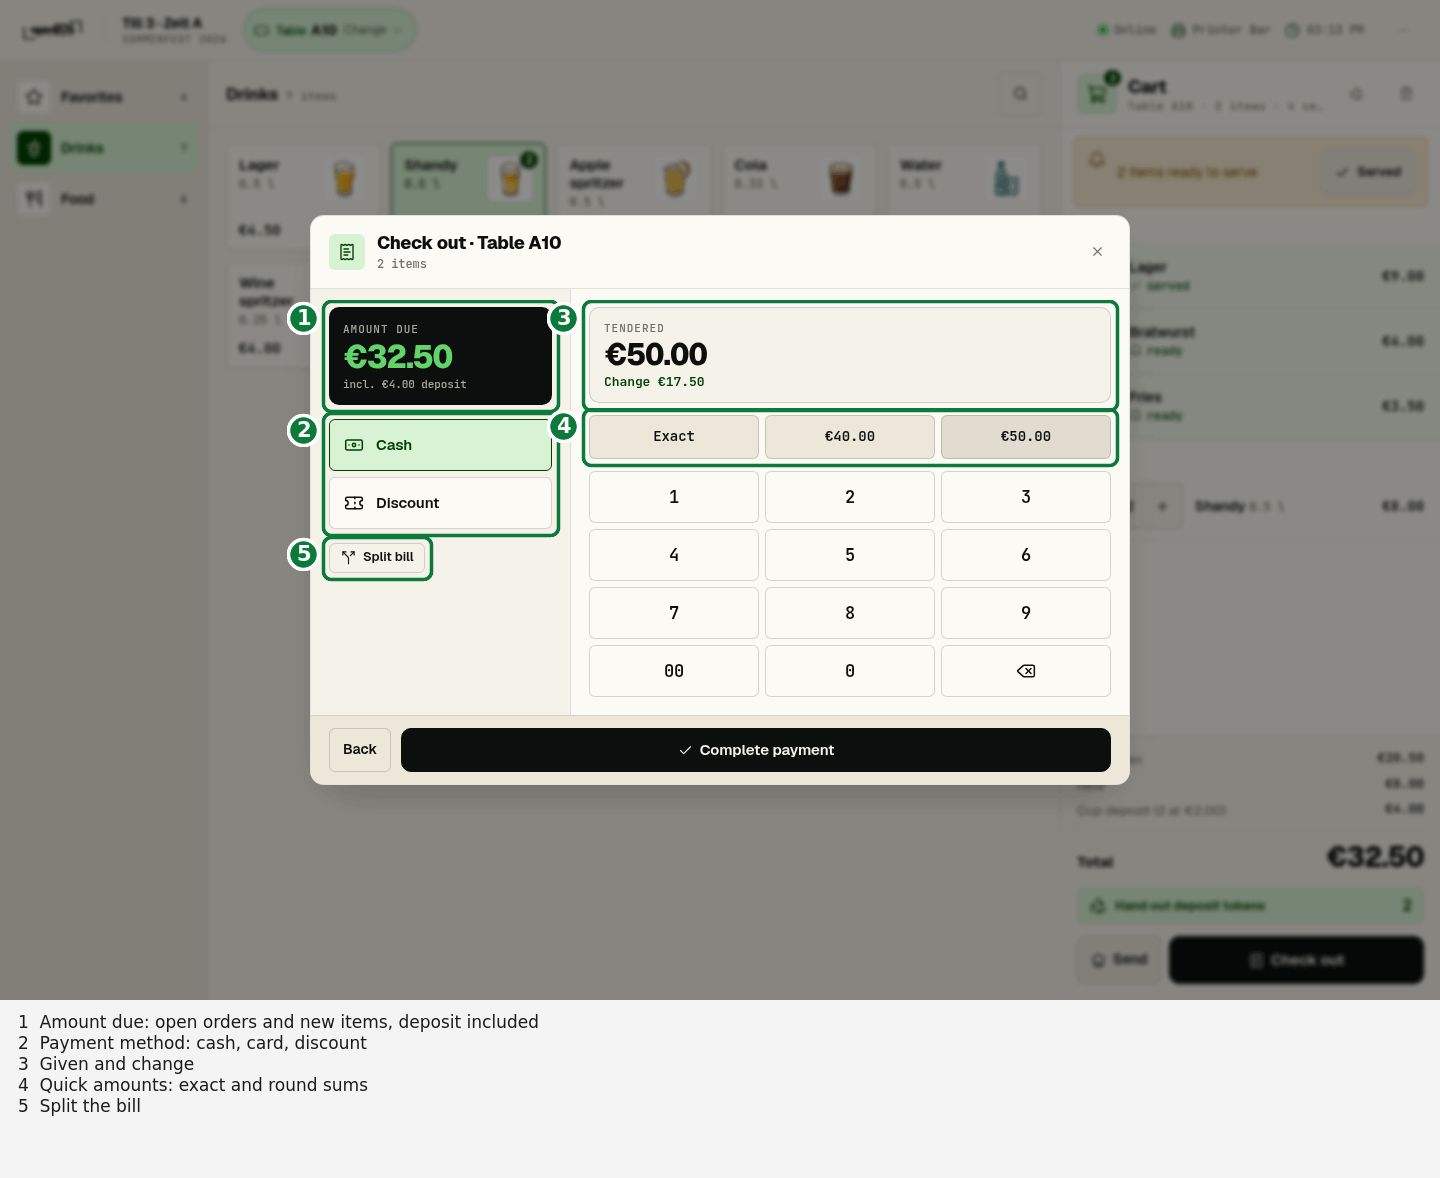
Check out opens the checkout sheet. On the left is the amount due (with the deposit it includes), below it the payment method.
Cash
- Enter the amount tendered on the keypad or tap a quick amount: Exact or the next round sums.
- The till shows the change — or, in red, what is still missing.
- If a cash drawer is connected, it opens as soon as cash is selected.
- Complete payment books the payment.
Card
With an assigned SumUp card reader, Card appears. Choose a tip (none, round up, fixed amounts or a custom amount) and tap Start card payment. The guest presents the card at the reader; the till waits for the confirmation. More under SumUp.
The money is taken first, then the order is saved. If saving fails (for instance because the connection drops), the till shows "Card payment successful, order not saved" with the transaction number. Tap Save again — and do not charge the card again. The notice stays even after a reload.
Discount
If discount vouchers are set up, Discount appears. Choose a voucher — fixed vouchers deduct their amount, for "Enter amount" you type it in. Applied vouchers are listed on the left below the amount and can be removed there. Then choose cash or card for the rest. If the discount covers everything, the button reads Complete without payment.
Split bill
At a table, Split bill sits below the payment methods. You select the items one guest pays for — sorted by order or by category — and take payment in cash or by card. Repeat until nothing is left. With the Run a tab checkout mode, new items that have not been sent yet are sent first. With Pay immediately, Split bill is only offered for orders that are already open (guest orders, for example), and not while new items are in the cart.
Without a SumUp reader, Split bill and Open orders offer "Card" with the hint ext. terminal: you take the payment on your own card terminal and record it here.
Done
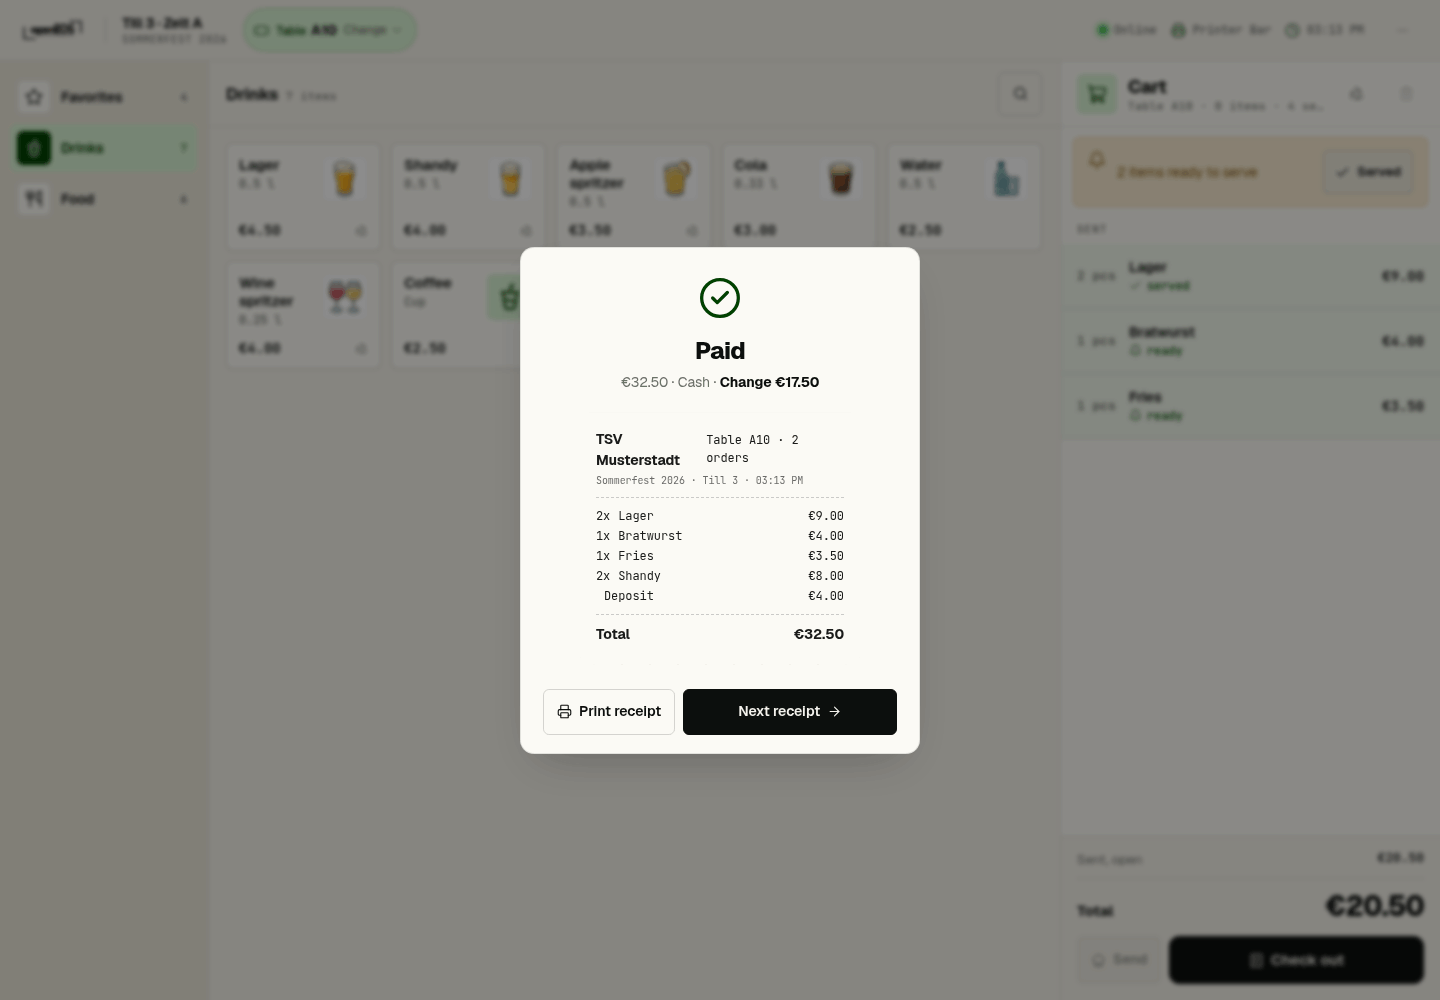
After payment the till shows Paid with the amount, method and change, and the receipt below. Print receipt sends it to the receipt printer (if the printer already prints on every payment, the button reads Print receipt again). Next receipt moves on. Without change the window closes by itself after five seconds; with change it stays until you have handed the money over.
Switching and parking tables
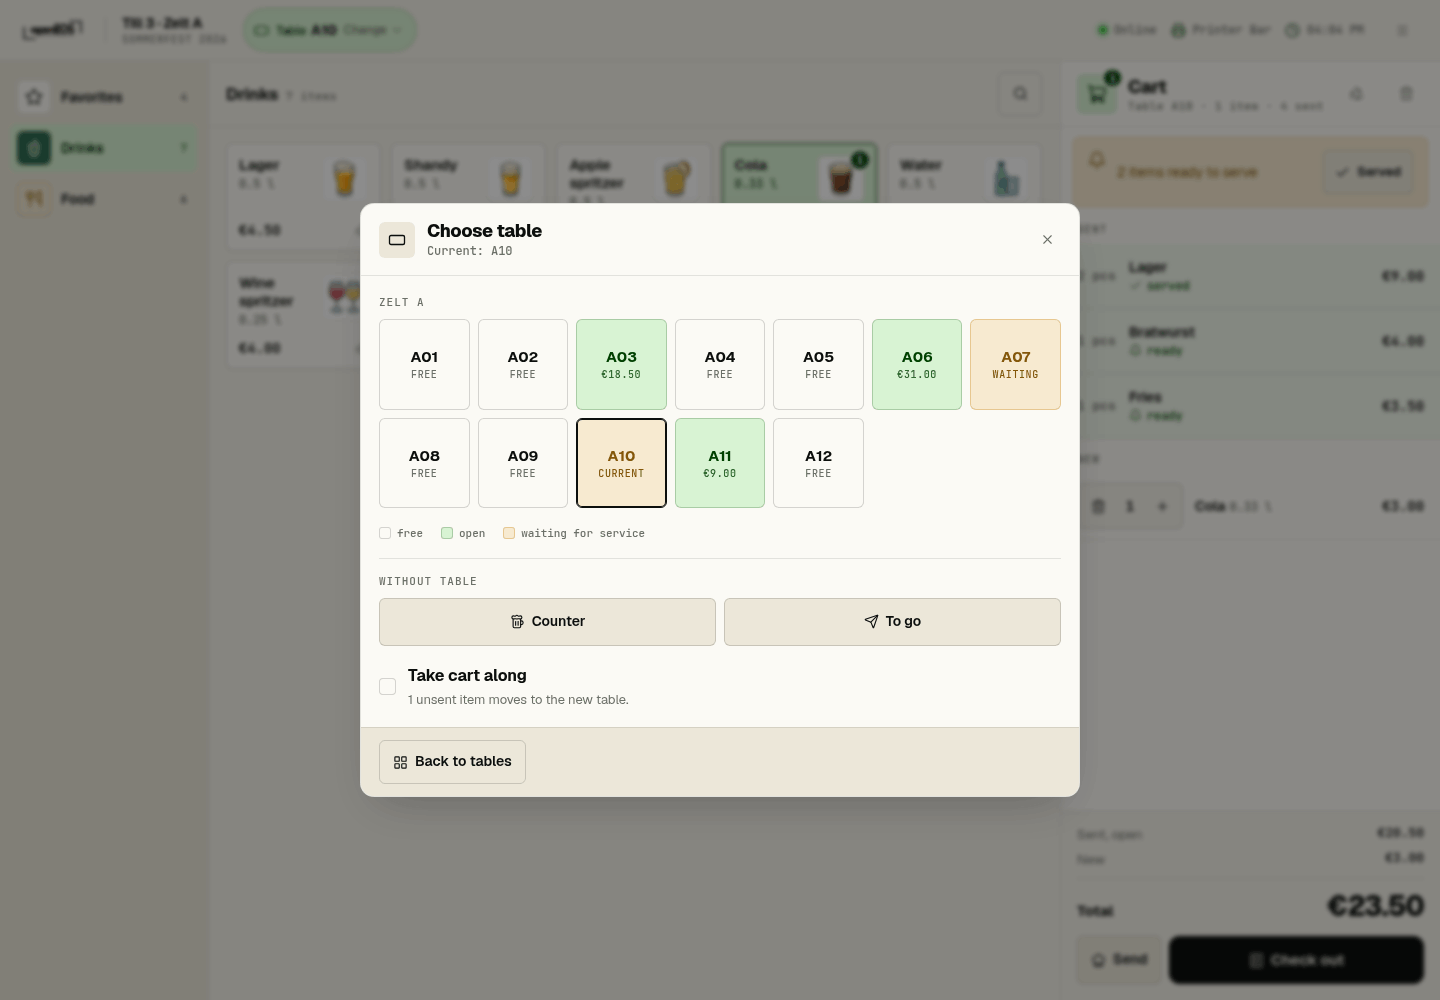
Tapping the table pill in the header opens Choose table: the same view as when opening one (number, list or map, depending on the device), the current table outlined, plus Counter and To go.
When you switch tables, the till parks the cart of the old table. When you come back, it is there again. Parked carts show up under Open tables with "… items not sent". If you typed items in at the wrong table, tick Take cart along before switching — the new items then move with you. Back to tables returns to Open table.
Items that have not been sent only live on the device they were typed into. Whatever other tills should see, you send. Sent orders are visible on every till and can be checked out there.
Signing in and locking
If Require PIN is set for the till (Devices), it asks for a PIN on start. Every member has their own PIN of 4 to 6 digits (Members), so it is always clear who took an order.
The initials and name then appear at the top right. The lock next to them locks the till: the PIN screen shows until someone enters their PIN. The cart, parked tables and the open table are kept. After a reload the till asks for the PIN again.
Without a PIN there is no staff member and no lock.
Order history
In the Menu, Order history opens the orders of the running event, filtered by All, Open, Completed and Cancelled. There you can reprint kitchen tickets and the receipt and cancel an order (with an optional reason).
Deposit
If an item has a deposit, the till adds it automatically — depending on your settings at the counter, at the table or both. If a guest only wants a refill, set Refill in the line's options window; no new deposit is charged for it.
For returned cups or bottles there is the Deposit return (menu or the button at the top of the cart): count how many come back per deposit type and choose
- Pay out — the guest gets the money back in cash, the cash drawer opens, or
- Offset — the amount is deducted from the current cart (only if there is something in the cart).
On phones and tablets
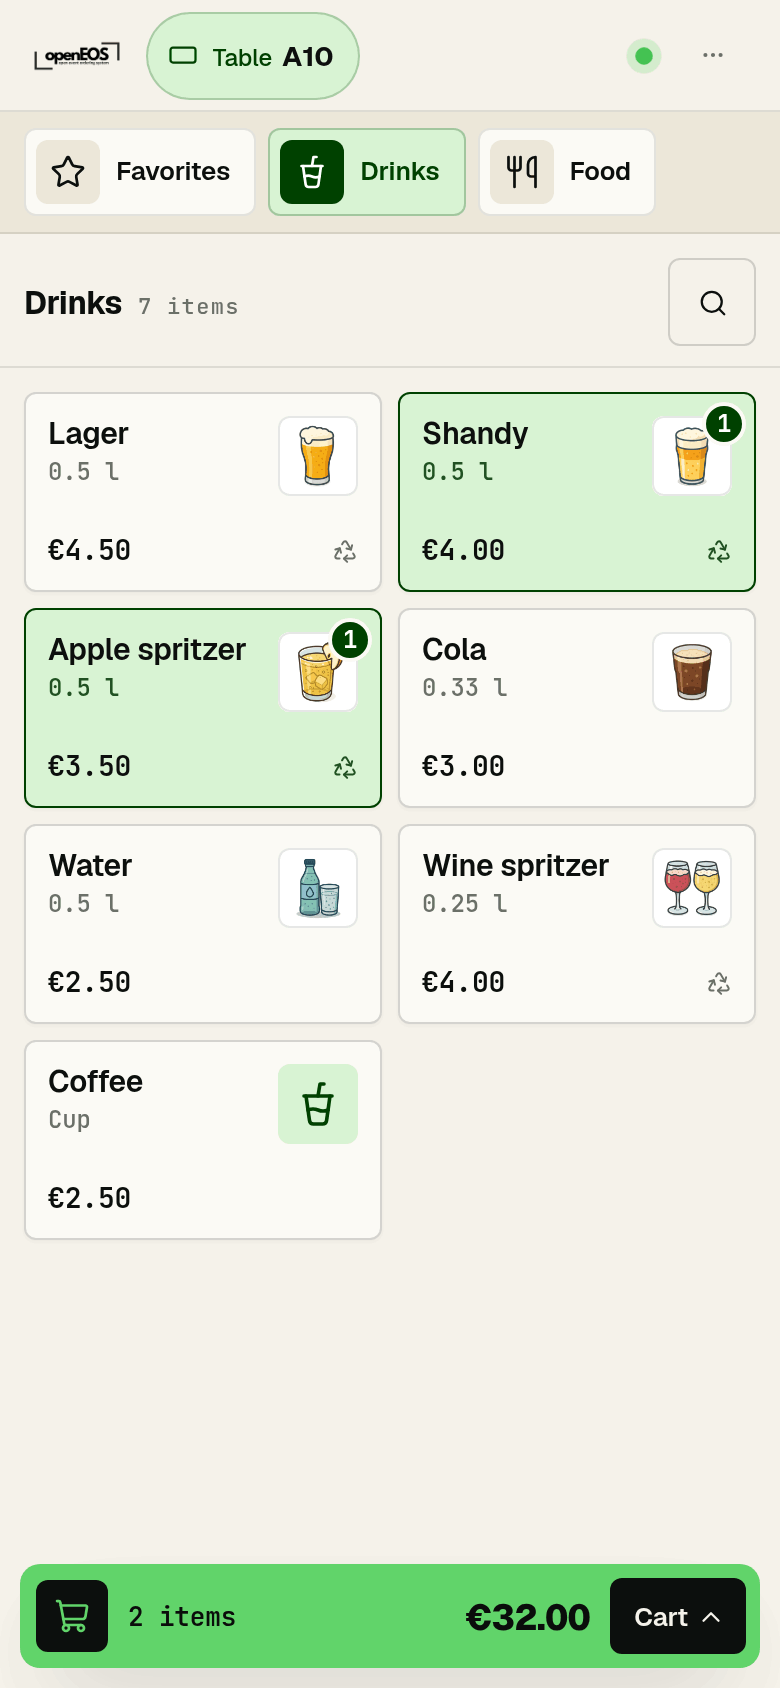
The till adapts to the screen width:
- Tablet in landscape and PC — categories on the left, items in the middle, cart on the right.
- Phone and tablet in portrait — the categories are a bar at the top, the cart is a green bar at the bottom with the count and total. Tapping it opens the cart from below. Sheets such as checkout, options or choose table also open from below.
Swipe to close: you close any sheet — cart, checkout, options, choose table — by dragging it down by its handle or header (or by its content when that is scrolled to the top). Let go too early and the sheet springs back. Swiping is switched off on the map so that you can move it around.
When the connection drops
The till needs a connection. The status at the top right shows how it is doing:
- Connecting … — the live connection is briefly gone. You can carry on as normal.
- No live data — the live connection has been missing for a while, so the till polls the server itself. Table states may lag a little; Open tables then shows "As of …" with the time.
- Offline — no connection. Below the header it says "No connection – sending and checkout work again once the register is online." Typing in items, switching and parking tables still works; Send, Check out and paying out deposits are blocked.
Orders are not stored and sent later. Plan for this: a marquee at the edge of the Wi-Fi is the most common reason for a till to stand still. Check the reception before the event wherever a till will stand.
If two devices check out the same table at the same time, the first one wins; the second reports "This table was just paid on another device." and shows the new state.
Signing out the till
Sign out device in the menu disconnects the device from the organization after asking first. It then has to be connected again — not something to do in between. To leave the till for a moment, use the lock.